featured, Food, Parenting

Spaghetti Ice Cream

Spaghetti Ice Cream

Months ago, a picture scrolled across my newsfeed of what appeared to be spaghetti….upon examining the post closer, I was surprised to learn that it was actually ice cream! I thought it was such a cute idea, and I made a mental note that I wanted to try it sometime. Fast forward to this past weekend, when another image of alluring spaghetti ice cream scrolls across my phone screen. I decided to do some research about this dish, and try to make my own!

Cool things I learned: This ice cream dish is actually German! I wouldn’t have guessed that, but it worked out well for me since I decided to try it out on a friend who spent several years in Germany! If it isn’t obvious, this is a GREAT dessert option for kids! They are pretty stoked about ice cream that looks like spaghetti! Let’s get down to the details about how to pull this off in your own home so that you too can impress German friends and children alike!
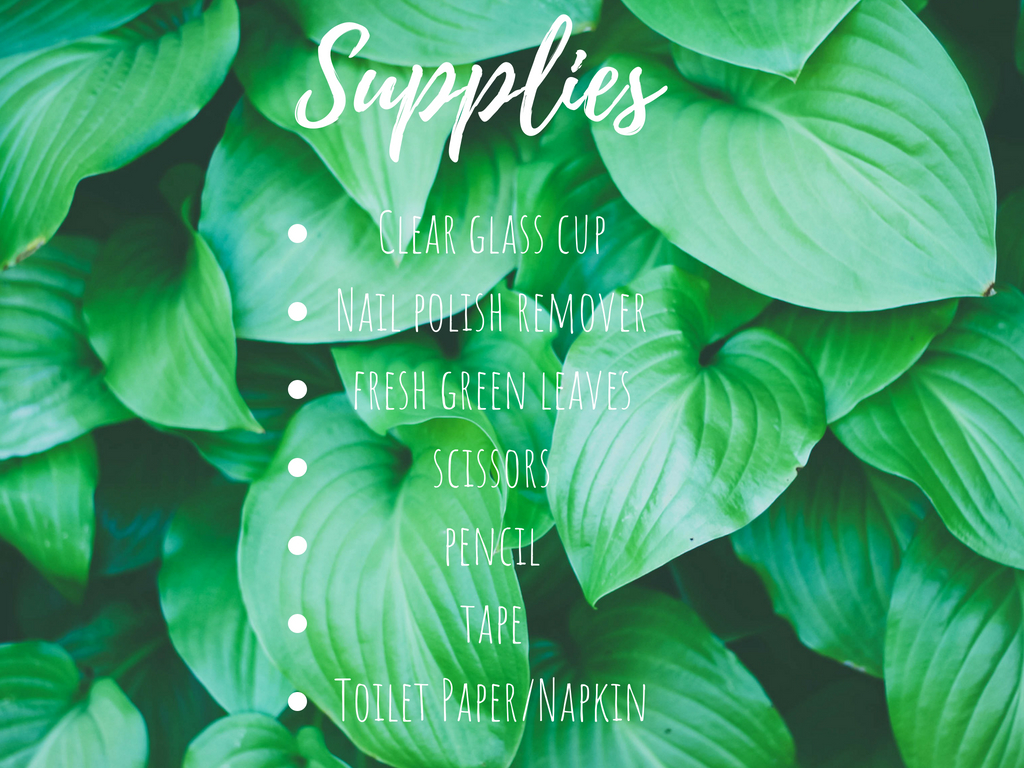
Items You’ll Need:

0911181827.jpg

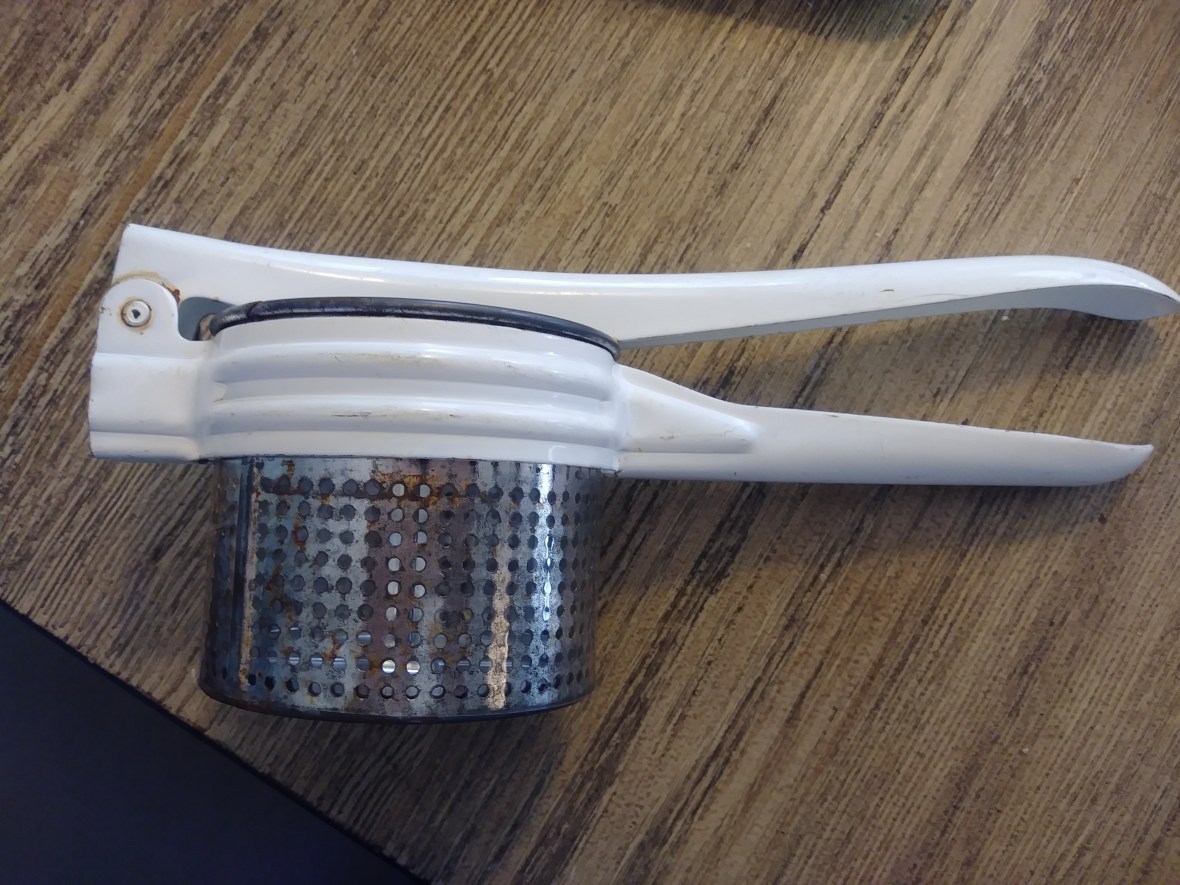
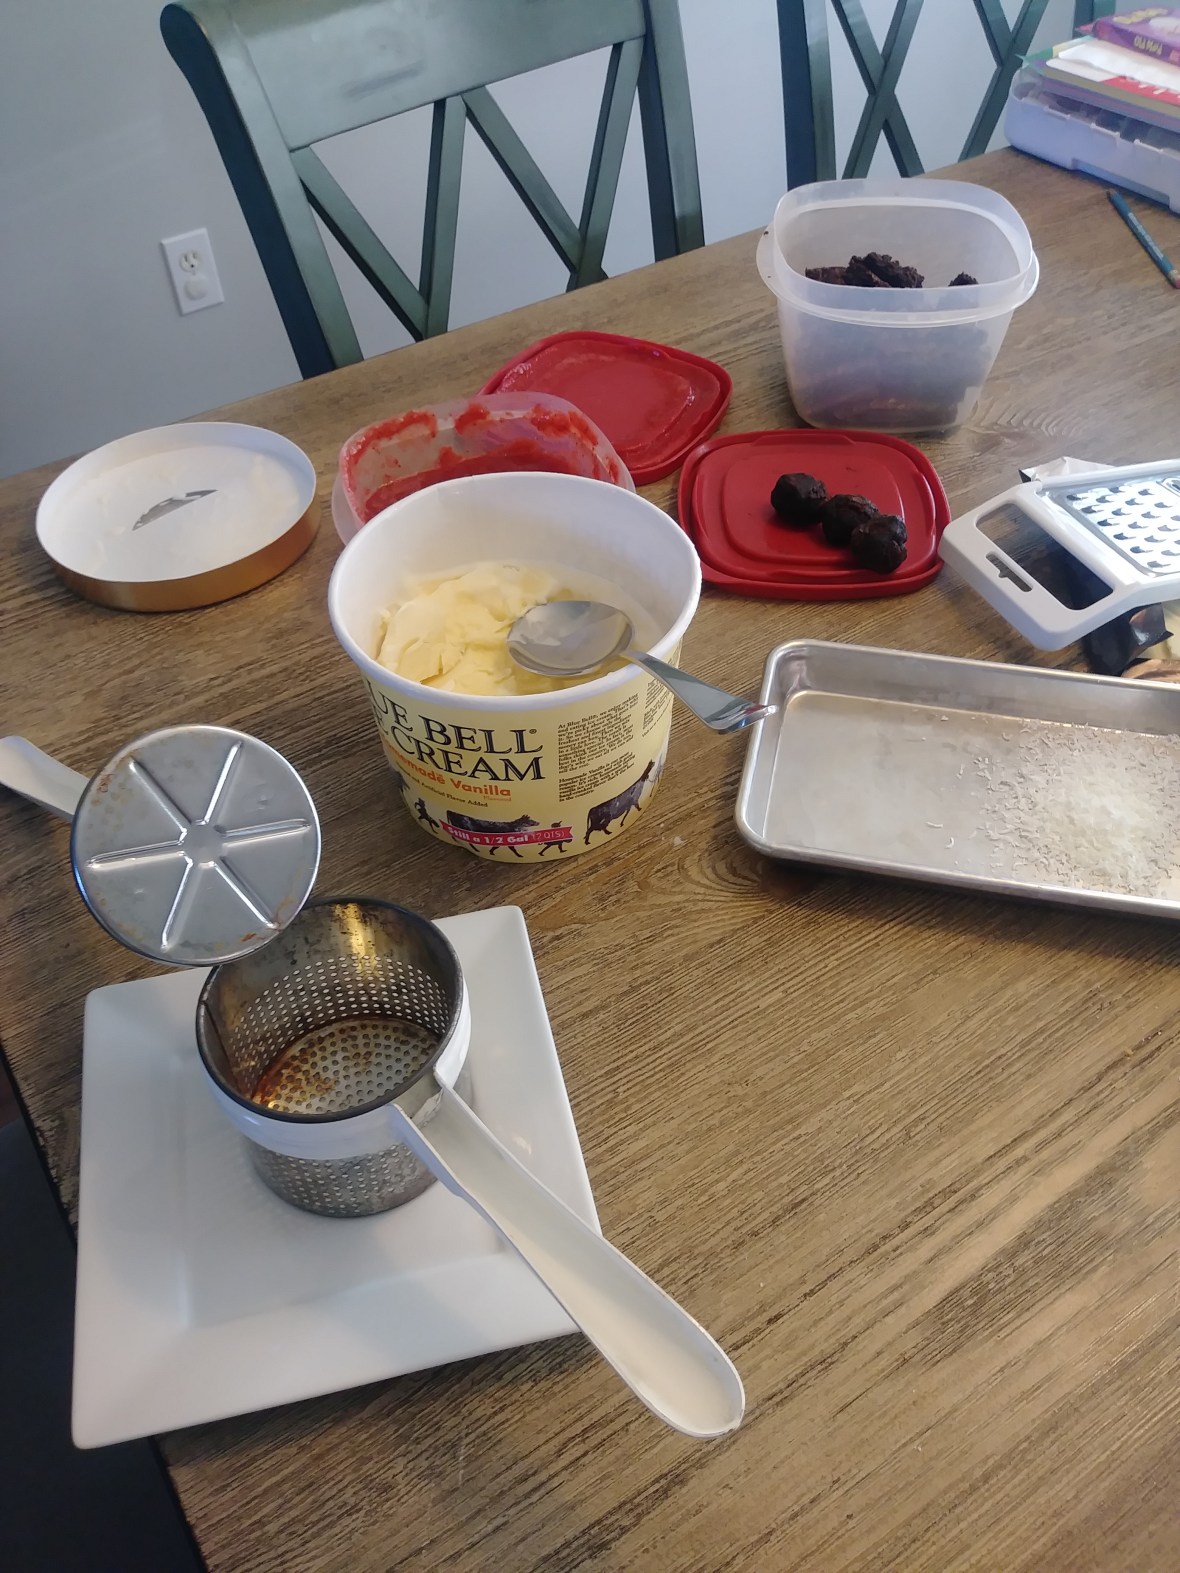
This crazy looking tool is a “potato ricer.” I got this bad boy from my Grandmother many years ago. I pushed it to the back of a drawer with no intentions of ever using it. I could not foresee a recipe that I would ever make that would require such a tool. I’m thankful for once, for my inability to part with things. I will say that it is preferred for this recipe, to have a ricer that has holes only on the bottom, but I was able to place a layer of packing tape around the sides to prevent leakage. It worked well, and got the job done. If you don’t have an ancient potato ricer that your Grandmother left to you, these guys are also available on Amazon. There are a lot of options out there, but HERE is a fairly cheap one.

0911181826_Burst01.jpg

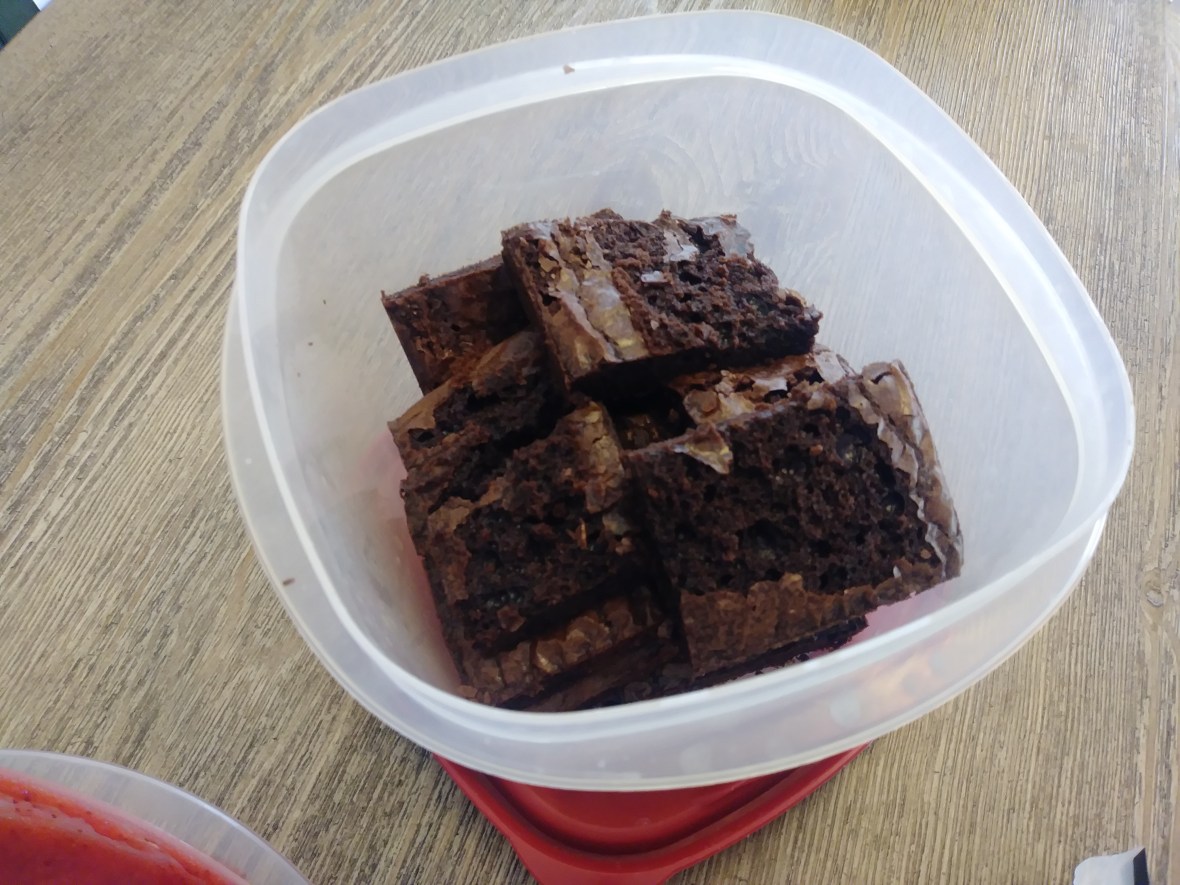
The “meatballs” in this recipe are optional. There are also a variety of options that you can use to make them. I baked a batch of brownies the night before. Once they were cooled completely, I shaped them into small balls with my hands. I’ve also seen people use Ferrero Rocher candies, and even small scoops of chocolate ice cream.

0911181828.jpg

You’ll also need some frozen whipped topping. Use a small to medium sized scoop in the middle of your plate FIRST. This creates height & some extra flavor. I have been advised that an unsweetened cream version is the most authentic.

A bar of white chocolate can be grated using a standard cheese grater to give the appearance of “Parmesan cheese.”

0911181833.jpg

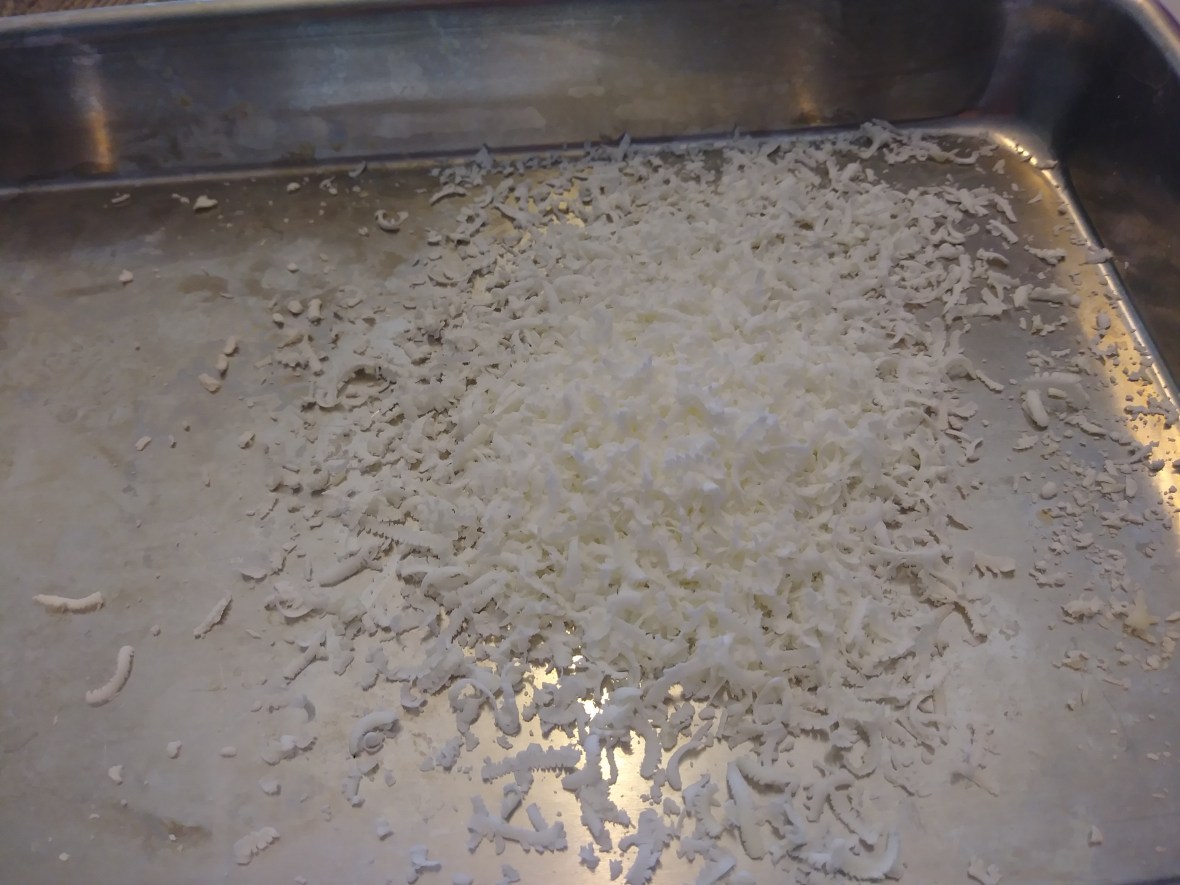
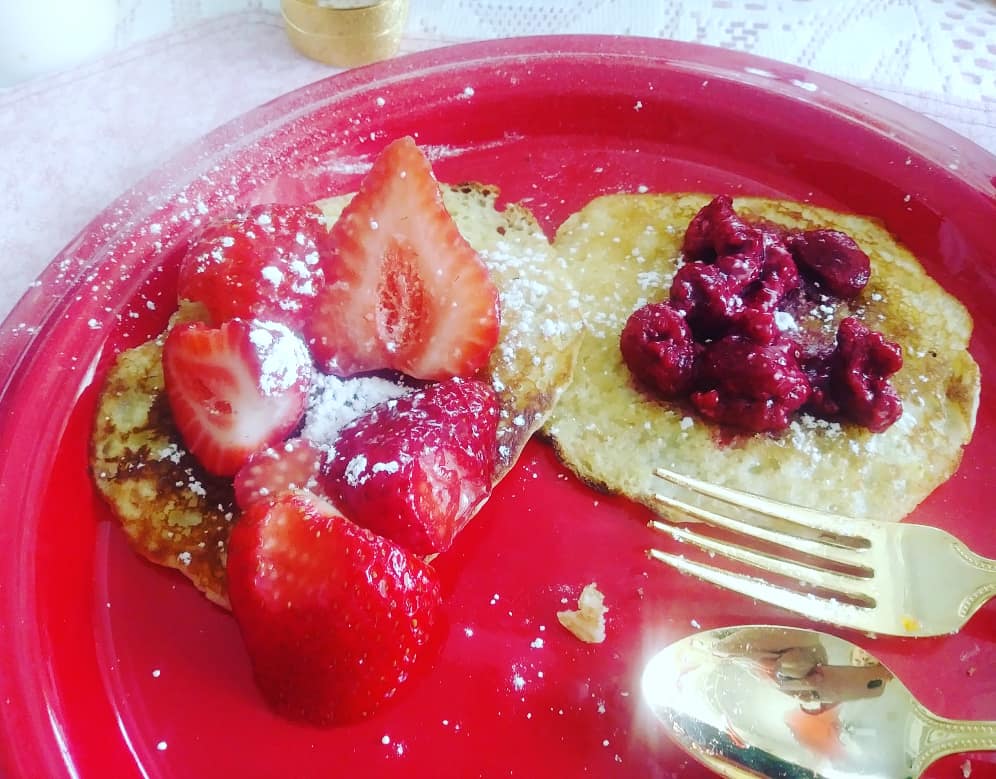
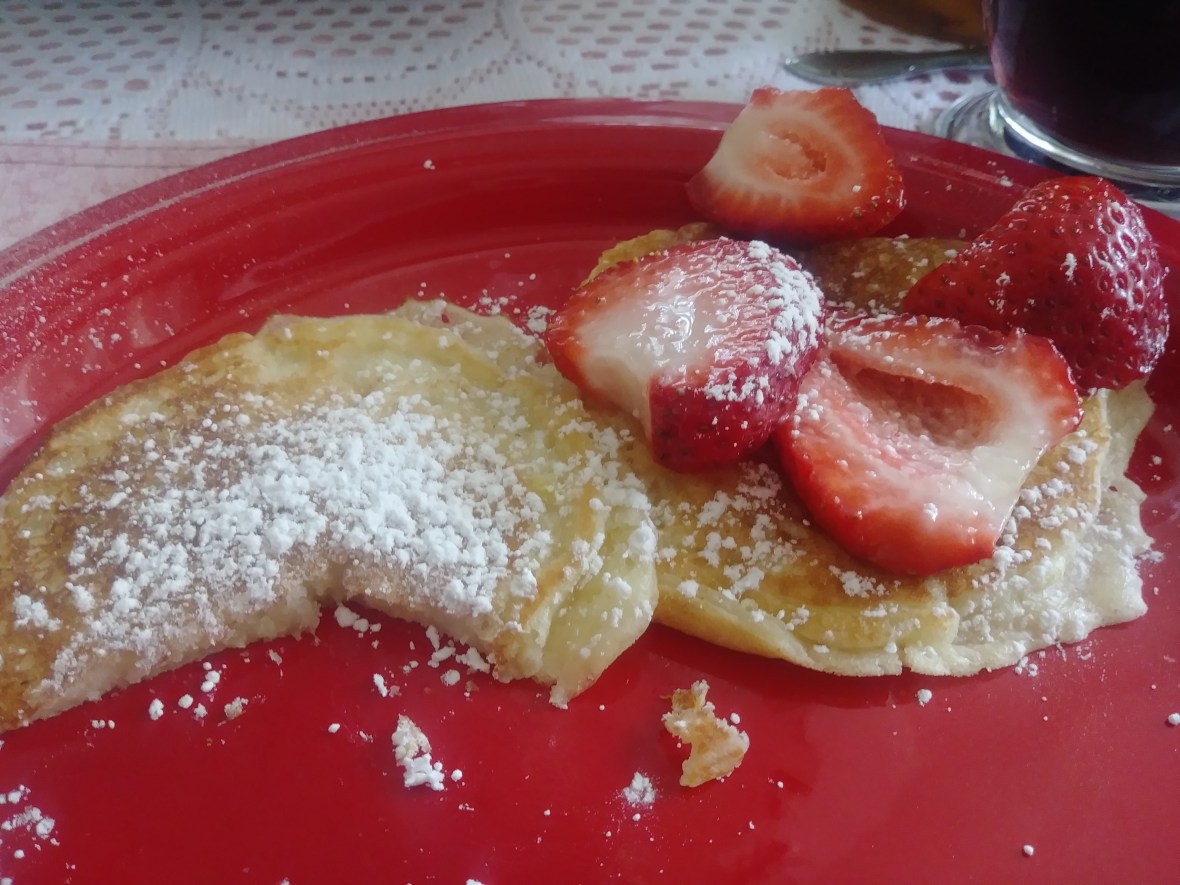
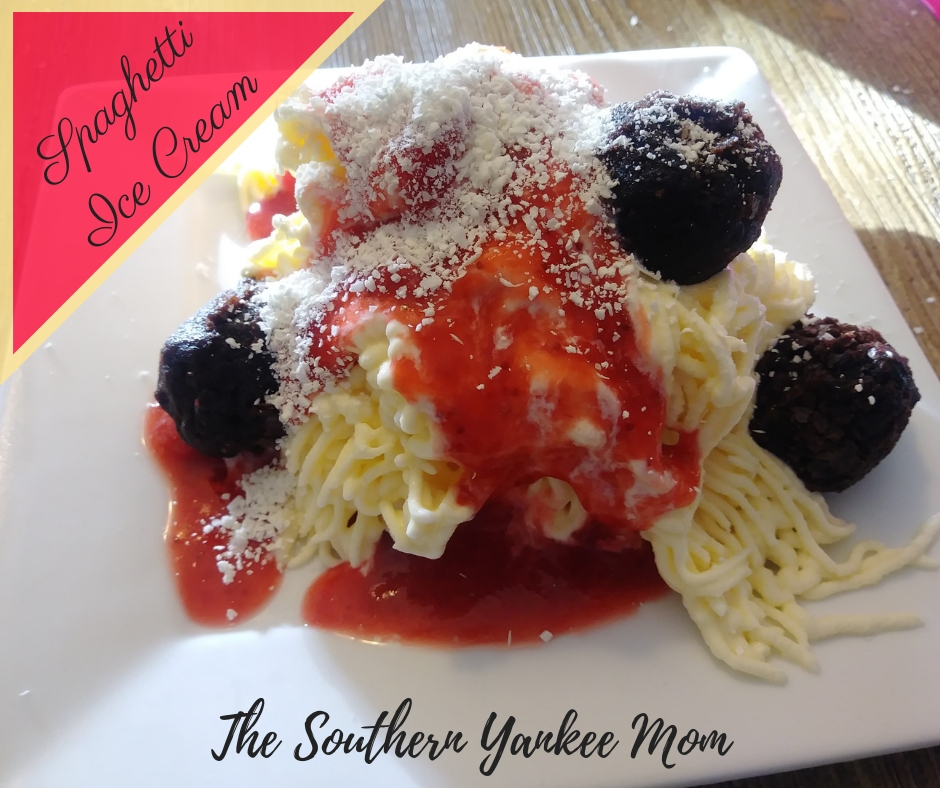
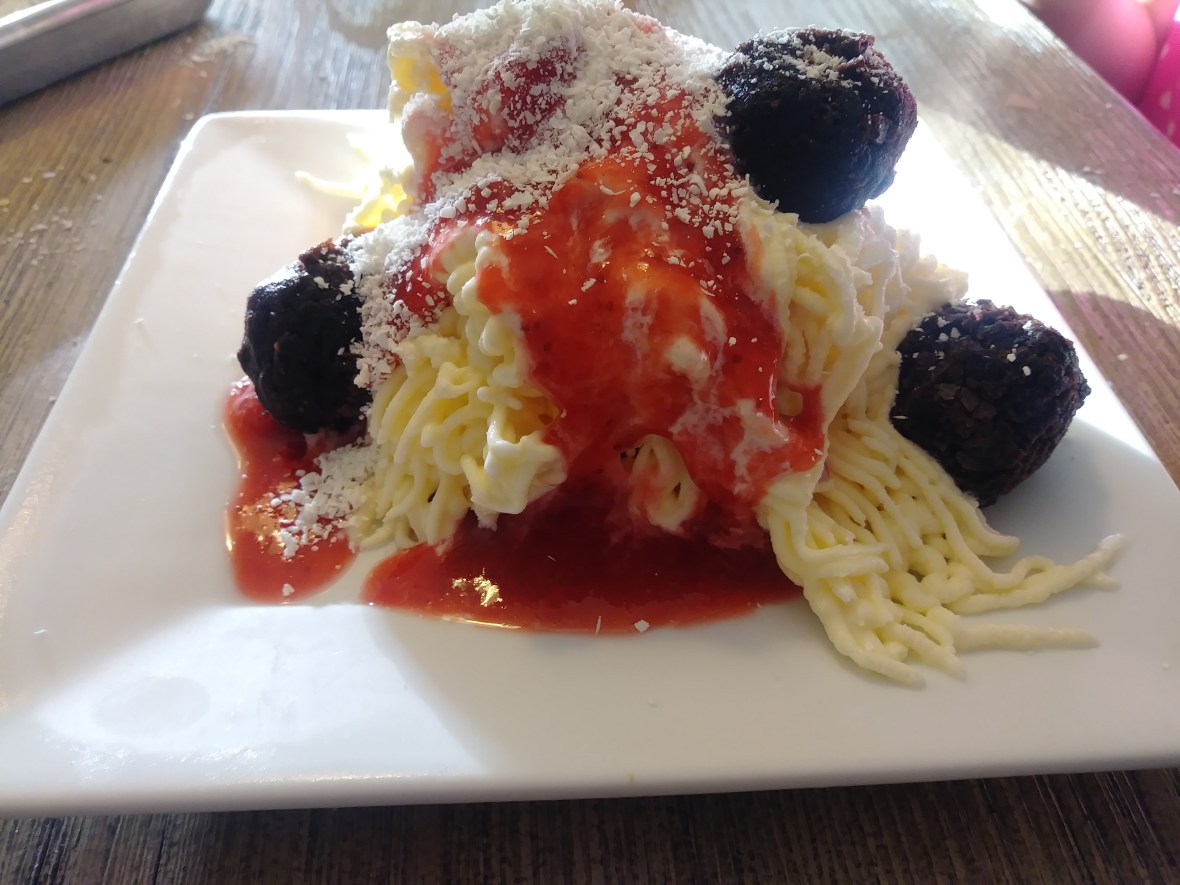
This was our finished product. It doesn’t take much, but adds a great visual detail to the dish.

0911181826.jpg

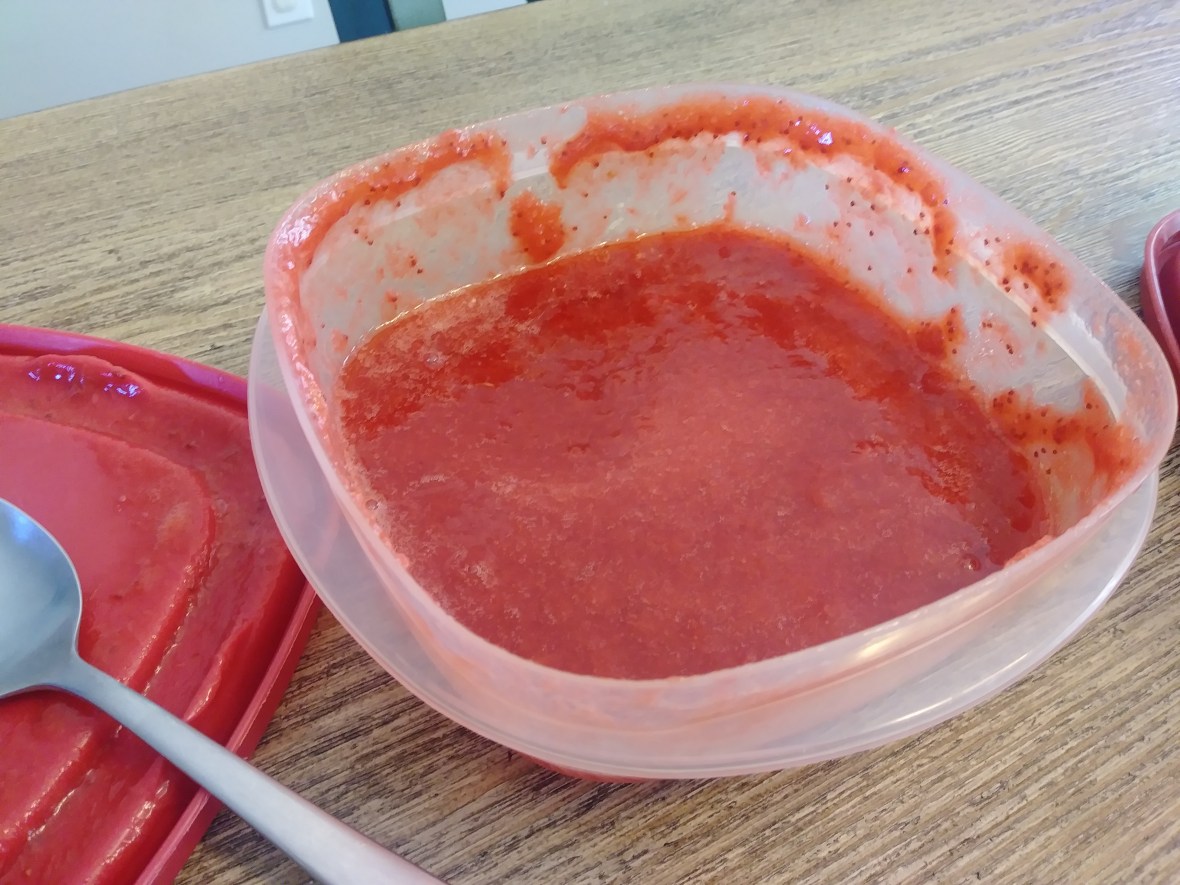
You’ll also want to have a strawberry sauce to use as the “marinara” for the spaghetti. I made a homemade sauce that was super easy and really good. I’ll include the recipe below. If you don’t want to make your own, you can purchase a pre-made version, or even warm up strawberry jam if you’re in a pinch!

Strawberry Sauce

  • 1 lb fresh strawberries (De-stemmed and chopped)
  • 1/3 cup Sugar
  • Fresh lemon juice (juice from 1/2 a lemon)

Combine all ingredients in a medium sauce pan over medium heat. Allow it to come to a boil. Reduce heat and allow to simmer for ~20-30 minutes. Let it cool in the refrigerator for a few hours or overnight. It will continue to thicken as it cools.

*I also used my immersion blender briefly to make it less chunky.*

0911181835.jpg

Finally, you’ll need some delicious vanilla ice cream or gelato. The most important things here are to get an ice cream free from chunky additives. Chocolate chips aren’t going to squeeze through that ricer. Additives also take away from the visual that we are going for here. The other important thing is to allow your ice cream to sit at room temperature to soften a bit. If it is fully frozen, it does not squeeze through the ricer well. The soft ice cream actually holds it’s shape better


0911181837.jpg

Now that we have everything we need, let’s discuss putting it together!

Directions

  • The number one tip I have is to freeze the plate that you will be making your spaghetti on. I placed my plate in a few hours before so it would be nice and cold.
  • After your plate is cold, scoop a small to medium size scoop of frozen whipped topping onto the frozen plate.
  • Next (using a separate plate) place the ricer on this plate so you can scoop the softened ice cream into it. You will certainly get some leaking and melting (hence the extra plate to catch the mess.) You’ll want to put a pretty large amount of ice cream in there.
  • Now that the ricer is full, pick it up and squeeze it out over top of your frozen whipped topping on the frozen plate.
  • Use a knife or spoon to scrape the bottom of the ricer and release the end of the “noodles.”
  • Next, cover the “noodles” in your strawberry sauce
  • If you are using “meatballs,” place them now
  • Finally, sprinkle the white chocolate “Parmesan cheese” over the top to complete your dish!
  • Get some pics and enjoy immediately!

0911181849b.jpg

I still plan to visit the restaurant that was featured in the original post!

You can check out their menu HERE.

I hope you and your kiddos enjoy this as much as we did!

Activities, featured, Parenting

Leaf Rubbings

LeafRubbings

It’s officially September! What does that mean??? It means that I can now shamelessly put up all my fall and Halloween decor without feeling guilty or embarrassing my neighbors! It means that I am now in full fledged “fall mode” despite the fact that it is still sweltering outside! Check out this little sneak peak of our fall mantle this year…

0904181118.jpg

I think it’s interesting that as a child, fall was my least favorite season. I’m certain this had something to do with school starting, and summer being over. As an adult, I simply adore the chilly air, the beautiful colors, fun recipes, and tons of holiday activities. As an adult, fall is now my absolute favorite time of year. I LOVE any excuse to decorate, and fall marks the beginning of “decorating season.” A mantle is a blank slate just waiting to be transformed. I used to be a purist when it came to fall decor. I never decorated with anything “Halloween themed.”I stuck with pumpkins, corn stalks, and hay bales.  I’ve always been under the opinion that Halloween decor was fake looking and somewhat “trashy.”  In the past few years, I’ve grown to appreciate the addition of a few Halloween pieces to my own decor. I think i prefer simple and more classic looking Halloween decor for my own home, but I’m open to anything that’s done up right! Here I utilized dried birch branches offset at different heights on the left. I also purchased some cut out bats a few years ago from Big Lots. I always stick them to the walls and decor on the mantle to add some depth. They are also waterproof and I use them outside on my porch as well. I have a few old windows and pictures that I rotate on the mantle throughout the year. I generally pick the oldest & spookiest looking window for this time of year. The rest of the decor was picked up during yard sales, and post holiday sales. I always keep an eye out for things even out of season to score a great price!

After decorating, I let Neyland chose our project this week. She chose to do leaf rubbings! This is one of our favorite fall activities, although we actually do it several times throughout the year. It’s also a nice way to get some “fall artwork” up in your home!

We started out by venturing out in our yard to collect some cool looking leaves. You’ll want to take the time to pick ones that have super cool patterns and shapes. Here are the ones that we chose.

0904181245c.jpg

0904181245a.jpg

If you can’t tell from the picture, she was pretty excited about this!

After you get your leaves, you’ll need a few sheets of white paper, some crayons, and a smooth surface. Let your little one pick a few leaves and place them on a sheet of paper. Next, place another sheet on top of the leaves and use a crayon to “rub” the pattern of the leaf onto the paper.

0904181250.jpg

0904181250b.jpg

0904181251a.jpg

You may want to help your kiddos hold the paper nice and still. Mine has a tendency to move the top paper around and lose her place on her leaf.

0904181258b.jpg

Check out our finished products!

0904181306_Burst01.jpg

We also took the time to identify and label what types of leaves we had collected and colored. She enjoyed learning that maple syrup actually comes from maple trees! Now we have some nice fall themed artwork to hang up in our home! Yay fall!!!

Activities, attractions, Parenting, Trips

The Lost Sea


The_Lost_Sea1
Photo Cred: http://www.guideoftravels.com/the-lost-sea/

I don’t know if you guys have noticed, but it’s been pretty hot outside as of late. Whenever it gets like this, I have a hard time getting motivated to go outside and find fun activities for us to do. In these temps, a cool 58 degrees sounds heavenly to this gal. Thankfully, we have some AMAZING natural attractions right in our own backyard that offer these steady year round temps!

Recently, Neyland and I visited The Lost Sea. It has been years since I visited this cave, and it seemed like a great time to take Neyland! A big cave system offers a great place to “hike” in cool temps, and provides a ton of educational experiences for little ones. The Lost Sea has a great history that includes use by local Native Americans, soldiers during the civil war, and even a prehistoric lion! It is the largest underground body of water in the US, and the second largest in the world! The “sea” itself hasn’t even been fully explored! The tour includes a guided trip through the cave, lots of history and info about the cave, and a boat ride on the sea! If you live in the area, I highly recommend this little day trip! It’s a perfect activity when it’s really hot OR really cold!

Check their website for hours and prices here: The Lost Sea Adventure

0805181349a.jpg

The entrance to the cave looks daunting! The temperature drops pretty rapidly! (I would recommend a jacket.)

0805181305a.jpg

Some of the rock pools heading down toward the room where the sea is located in. It is really interesting that there is only ONE visible source of incoming water in the cave, though there must be many. The water in the sea empties out into multiple surrounding bodies of water, but those passages have never been located or explored!

0805181239.jpg

The “main room” of the cave is absolutely massive. Pictures don’t do it justice.

0805181345.jpg

This formation is known as “the bear’s paw.” If you hug it, you’re supposed to have good luck! Neyland didn’t care much about “good luck,” she just wanted to hug the paw!

Her favorite parts were:

-Hearing about the prehistoric lion

-The boat ride

-Feeling the water

-Seeing the HUGE trout in the lake

I thought I would also point out that the last time that I was at The Lost Sea, I did one of the wild cave tours. That is where they take you on a much longer “behind the scenes” tour through the cave. There are a BUNCH of cool areas within the cave to explore. Most notably, I remember “The Meat Grinder.” As it’s name suggests, it’s a tiny space you have to crawl through. I will advise you to wear old clothes and shoes as you will be COVERED in clay and mud, but it is absolutely worth it! I highly recommend this tour for older kids!

What cool attractions have you visited lately?

Activities, featured, Parenting

What Makes Leaves Green?

What Makes

Our Science Experiment Tuesday was postponed this week due to some pressing engagements. We were both pretty bummed about missing our weekly activity, so we held our first ever Science Experiment *Thursday* at my Grandmother’s house! This wasn’t an experiment that I planned on, so I didn’t bring any supplies…Thankfully Grandmas are ALWAYS prepared for any emergency, including scientific experimentation! (Seriously though- My Grandma could probably set a broken bone, mend some pants, lend you a toothbrush, and provide you a coupon to any restaurant, simply with the supplies in her purse!)

We’ve been focusing on plants a lot lately since summer is drawing to a close, and we’ll soon see the leaves beginning to change. I decided to focus this experiment on what exactly makes plants green. As adults, we know that this is chlorophyll. But how can we extract the chlorophyll from the leaf so that curious eyes can see it?

I remember doing this activity as a kid. If I’m not mistaken, I learned about it on a children’s science program on tv. It must have been pretty cool to stick with me all these years! It is fairly easy, and uses supplies that you probably already have at home! If you can’t already tell, it’s great for a quick unplanned activity.

Supplies(1)

0830181209.jpg

Step 1

Take your little one outside and collect your leaves. (Please don’t skip this step!) It is great to let them look at all the different shapes and textures of leaves in their very own yard! As you can see, Neyland chose a variety of shapes and sizes. We even found a “lamb’s ear” leaf (See title photo) that was fuzzy and super soft!

0830181211.jpg

Step 2

Use the scissors and cut a long thin strip of your napkin/toilet paper. It needs to be taller than the glass that you are using, and about twice the width of the pencil. The most important thing is that you are using a WHITE piece of toilet paper or napkin. We need it to be nice and white for the green chlorophyll to stand out.

0830181213.jpg

Step 3

Snip up the leaves into tiny pieces and place them into the clear glass. If your little one is old enough to use scissors, this is also a GREAT fine motor skill for them! We basically need to get to the inside of the leaf where the chlorophyll is contained. The more of the “inside of the leaf” you expose, the easier this will be. I chose to grind up the leaf bits with the flat handle of a screwdriver after Neyland cut them up, just to make sure we wouldn’t have any trouble.

0830181221a.jpg

0830181224.jpg

Step 4

Add enough finger nail polish remover to barely cover the leaves. We want enough to mix the leaves up into a little “leaf soup.”

*Remember that nail polish remover is highly flammable – do this in a safe location*

0830181224a.jpg

Step 5

Lay out your strip of napkin/TP. Place your pencil at the top of the strip. Use a tiny piece of tape to secure the strip to the middle of the pencil, and roll up the strip around the pencil a few times. The pencil will sit across the top of the glass allowing the paper to dangle down into the “leaf soup.” Use the pencil to shorten or lengthen the paper to the appropriate length for your glass. It should look like…..

0830181225.jpg

Step 6

The paper should be touching the “leaf soup.” The nail polish remover will draw the chlorophyll out of the smashed leaves and it will “wick” up the white paper. While you can see some movement & color change right away, it is far more dramatic if you let it sit for a few hours.

0830181521.jpg

The finished product is pictured above.

We discussed how the chlorophyll uses the sun to make energy for the plant. This is why a plant’s leaves are wide and stretched out toward the sun. We also discussed that the leaves will soon be changing and eventually fall off of the trees because the days will be shorter & there won’t be much sun for energy.

I can’t wait to take this line of learning full circle as we continue to watch what happens to the trees and plants this fall and winter!

Activities, featured, Parenting

Candy Cooking

Candy Cooking

Backup plans. They are important things to have. You probably never thought you would need them as a parent, but they are ever so helpful. We all know that parenting doesn’t always go as planned. You can plan events and activities with the utmost precision, but things happen & inevitably something will go awry. I like to keep a “mental list” of contingency plans for such situations. If I’ve specifically promised my daughter an exciting activity and the weather doesn’t cooperate, I can quickly pull out an appropriate substitute plan. One gadget that I keep around for tons of fun at the drop of a hat is the Poppin’ cookin’ Japanese candy cooking sets. These little kits don’t take up much space, they have a crazy long shelf life, and only require water to get started!

IMG_20180816_142339_778.jpg
Neyland mixing the “dough” for the dumplings and spring rolls

Each set comes with a little plastic tray with a variety of different sections for mixing and shaping the different parts of the dish you’re making. It also comes with a bunch of packets of different colored powder. The directions are pretty simple- Add water to the different packets. The amount and location you should mix them are all found on the directions. Depending on your kit, you may then take the resulting “dough” or liquid and place it in a separate area to shape it. The “ramen” kit we were making here, also had accompanying “spring rolls” and “dumplings.” The packaging even doubles as an area to roll out dough and place the “food” for cool photo ops.

IMG_20180816_142339_773.jpg
Our “dumplings and spring rolls” are complete!

One of our previous kits involved making candy “sushi.” We had fruit roll up “seaweed” and even had to make salmon roe! As different as all the dough and liquids looked (at least in that previous kit) I was amazed that all the elements tasted the exact same! This time, the “broth” in the ramen did have a different flavor.

IMG_20180816_142339_774.jpg
Dropping in our “ramen noodles”

I’m always transfixed at the chemical reactions that obviously take place when you make these kits. I will be the first to say that I don’t understand how they work, but they’re pretty cool to watch!

IMG_20180816_142339_776.jpg
Victory!
IMG_20180816_142339_771.jpg
Trying out the noodles

IMG_20180816_142339_780.jpg

IMG_20180816_142339_765.jpg

The first time I saw these kits, I believe it was on youtube. I happened across them in a local Asian market here in Knoxville, and decided to give one a try. I’ve even ordered them off Amazon. They are generally pretty reasonable at around $3-4 per kit. Here is the link to the Sushi Kit on Amazon. So far, we have made the sushi kit, an ice cream kit, a doughnut kit, and this ramen kit. The Sushi and Ramen kits were our favorites by far. They were more intricate and took longer to make. I will say that some of the parts are small and therefore not for tiny kids. As always, watch your kiddos closely while they do this. I read the instructions and let Neyland mix the water and powder. We form the shapes together, but I’m sure that an older kid would have no problems with doing that part alone.

*Disclaimer* I am SURE the nutritional value in these kits is zero. Keep in mind that they are candy, and should be used as an occasional treat.

Have you made a Poppin’ Cookin’ set before? Which is your favorite?


Uncategorized

Lyrical Challenge

Many thanks to Valleygirlwalking for nominating me for the Three Day Lyrical Challenge! Day 1, here I go!

The Rules

1. Thank the person who nominated you. Thank you once again, Valleygirlwalking
2. Share one of your favorite songs/lyrics one at a time for three days.
3. Nominate three other bloggers each day. (Or one, one is probably enough)

Nomination

Today, I nominate GypsyRD Her tagline is, “Exploring the wonders of food one bite at a time” and she is definitely doing that. She is constantly teaching me new things about food and how to eat! I am constantly in awe of the recipes she comes up with! Her creativity shines SUPER bright in the kitchen!

The Song

Revelation Song

There is so much to say about this awesome song! It is one of a limited number of songs that really portray the complete awesomeness of our God. I think it does this so well because most of the lyrics are actual scripture! As the title suggests, most of this scripture is found in the book of Revelation. What better portrays God’s awesomeness than the Word itself?

Revelation 1:8 “I am the Alpha and the Omega- the beginning and the end,”  says the Lord God. “I am the one who is, who always was, and who is still yet to come, the Almighty One.”

Revelation 4:3-5 “The one sitting on the throne was as brilliant as gemstones-jasper and carnelian. And the glow of an emerald circled his throne like a rainbow. Twenty-four thrones surrounded him, and twenty-four elders sat on them. They were all clothed in white and had gold crowns on their heads. And from the throne came flashes of lightening and the rumbles of thunder…”

Revelation 4:8  “Holy, holy, holy is the Lord God Almighty– the one who always was, who is, and who is still to come.”

Revelation 5:12-13 “And they sang in a mighty chorus: The Lamb is worthy-the Lamb who was killed. He is worthy to receive power and riches and wisdom and strength and honor and glory and blessing.” And then I heard every creature in heaven and on earth and under the earth and in the sea. They also sang: “Blessing and honor and glory and power belong to the one sitting on the throne and to the Lamb forever and ever.”


The first time I heard this song, it was in a church I was visiting. It was being sung by my now, very good friend, Blair and her husband Danny. It’s very special to me because that song helped draw my husband back to church and ultimately to God. When he was drawn back to church, I was still very reluctant. I had experienced a deep hurt at our previous church, and I was still harboring anger about it. Thankfully, God softened my heart, and working through this song, brought me back to him.

It’s been years since that happened, and my husband is now my ex husband. This song still holds a very special place in my heart. It always reminds me of how God drew me back after all my anger and rebellion. My hope for others is that it will have the same effect. If there is one who is capable, it is the God who is worthy of all the praise expressed by this song.

The Lyrics

Worthy is the Lamb who was slain
Holy, holy is Thee
Sing a new song to Him who sits on
Heaven’s mercy seat
Worthy is the Lamb who was slain
Holy, holy is He
Sing a new song to Him who sits on
Heaven’s mercy seat
Holy, holy, holy is the Lord God Almighty
Who was and is and is to come
With all creation I sing praise to the King of kings
You are my everything and I will adore You
Clothed in rainbows of living color
Flashes of lighting rolls of thunder
Blessing and honor strength and glory and power be
To You the only one who’s King
Holy, holy, holy is the Lord God Almighty
Who was and is and is to come
With all creation I sing praise to the King of kings
You are my everything and I will adore You
Filled with wonder awestruck wonder
At the mention of Your name
Jesus Your name is power, breath and living water
Such a marvelous mystery
Oh, You’re worthy, mystery
You are worthy
Holy, holy, holy is the Lord God Almighty
Who was and is and is to come
With all creation I sing praise to the King of kings
You are my everything and I will adore You, I will adore You
There are a lot of different artists who sing this song, but Kari Jobe is probably my favorite.
Activities, Parenting

Rainbow Flowers

RainbowFlowers

This week has been pretty busy. I had to finally embrace the whole “being thirty” thing, but it has been great thus far. Neyland and I did a lot of fun projects this week. She was a particularly good girl this week and worked really hard on all her homework, chores, and even memorized several scriptures from church. In return, we had a lot of fun outings and activities to reward her excellent work. For “Science Experiment Tuesday,” I pulled an old project out of my hat from when I was a kid. We decided to make rainbow flowers!

This experiment is one more geared toward preschoolers and older kids. The experiment isn’t instantaneous, and therefore won’t hold the attention of younger kiddos. Neyland is really into wanting to know how things work, so it was a great demonstration for her. We started off with a trip to Grandma’s flower shop to pick out the flowers for our experiment. The type of flower isn’t super important. We chose some daisy poms because they hold up well at room temp, and are overall, pretty resilient. Some of the more delicate flowers may wilt after a few hours. The big thing is to (obviously) get WHITE flowers so your little one can observe the color change.

0814181251a.jpg

We also got three different stems of daisy poms. Each stem has multiple flowers, so we would get to see more action.

Next, pull out your food coloring and a few glasses of water. I let Neyland choose what colors we would make in each glass. It was also a good way to review which colors can be mixed to form other colors. She chose to make: Purple, Blue, and Green.

0814181250.jpg

0814181254a.jpg

0814181255.jpg

0814181255a.jpg

We mixed up the colors, trimmed excess foliage off the stems, and then finally snipped the stems to freshen the ends. One trick to note is that the shorter you trim the stem, the faster the experiment will yield results. The colored water has a shorter distance to travel. Also, by getting rid of the excess foliage, you limit other areas for the colored water to be carried to. After cutting the stems and placing them in the water, we set them near the window.

0815181946a.jpg

Within an hour or two we were already getting visible results! We used this to discuss how plants draw up water and use sunlight to make energy and grow! It was an exciting thing that she got to check on for the next few days. Our “blue” flowers yielded the best color. The green was very subtle and not easily noticeable.  The purple was very interesting. It yielded some purple spots, some red, and some blue. For whatever reason, the colors separated back out somewhat.

This is a super easy and cheap experiment to recreate at home! Even if you have never done it before as a kid. You probably have food coloring in your pantry, and you might even have some white flowers growing out in your yard! Get out there and have a great time with what you have!

Rainbow Flowers

Supplies

  • White flowers (that remain sturdy at room temp) – Rec. carnations, daisies, poms
  • Variety of food coloring
  • Glasses
  • water

Directions

Fill the glasses 3/4 full of water. Color each glass of water with a different color using the food coloring. Trim excess foliage from the flowers and snip the end of the stem before placing it in the water. (Snip the stem IMMEDIATELY before placing it in the water) Set the glasses in a sunny spot and monitor them periodically for changes. You can keep this experiment going for a few days! Just remember to trim the stems on your flowers fresh each day to maximize the amount of water they take in!


Activities, featured, Food

Sunday Sundaes

How is the weekend already over??? We had such an awesome weekend, it just doesn’t seem fair that tomorrow is already Monday. Well, here’s to starting this week off right!

This weekend, my friends and family were kind enough to throw me a surprise birthday party for the big 3-0. Thankfully, someone decided it was a good idea to tell me about it since they planned it at MY HOUSE. Pretty sure full blown panic would have set in if 20-30 people had just randomly shown up at my place on Saturday. It was a great time full of food and lots of laughs! Thanks to everyone who came and celebrated! (Unfortunately we were all having such a blast, we totally failed to take any pictures!)

This morning we enjoyed an absolutely fantastic church service! I love when service just “happens” to be on things that I’ve been studying privately! Our service today was on worship. We discussed the different examples of worship in the bible and the specific kinds of worship God specifically asks for! There are many terms for types of worship in Hebrew. It was really interesting and eye opening!

After service, we enjoyed a nice relaxing day out by the pool, followed by homework for Neyland, and most importantly…..the post homework treat! ICE CREAM!

We discussed taking a trip downtown to try the new Cruze Farm location…but as with most new places, IT WAS PACKED. We elected to give it a few more weeks to let the “newness” die down. We decided instead to visit one of my favorite ice cream spots of all time. It is also conveniently, right across the street.

Phoenix Pharmacy & Fountain is everything you could possibly want with a super authentic “old time” feel. This place has a HUGE menu of sundaes, malts, floats, and seasonal specials. They make everything from scratch. All the toppings, whipped cream, you name it. All their ice cream is served in old fashioned glass dishes, and the staff even dresses in classic attire! The pharmacy is still in operation too! Bottom line: This place is the FULL experience. Amazing treats and a full authentic soda shop experience. Check out what we got this time!


Check out their website & menu HERE.

IMG_20180819_194010_624.jpg
Neyland’s Sidecar – Classic Sundae, only smaller for kids
IMG_20180819_194010_627.jpg
I had the “All American.” It was mixed berry cobbler with homemade vanilla ice cream!
IMG_20180819_194010_625.jpg
My brother had “The Great Smoky Mountains.” A fudge soaked vanilla cake  & a fudge brownie topped with vanilla ice cream, homemade brittle, and homemade caramel sauce!
IMG_20180819_194010_629.jpg
My Mom had the “Twixy.” Scoops of vanilla on top of homemade shortbread crumbles with milk chocolate & caramel drizzle.
IMG_20180819_214332_604.jpg
Neyland was happy to help finish off any leftovers.

We enjoyed a nice stroll through Market Square and Gay Street before calling it a night!

IMG_20180819_214332_590.jpg

If you’re into an authentic experience, don’t pass this place up! After all, Sundays are for Jesus and Sundaes!


Food

Birthday Breakfast

IMG_20180816_141758_493.jpg

If it hasn’t become extremely obvious by now, I thoroughly enjoy celebrating birthdays & holidays. I’m always looking for some reason to decorate or make someone feel special. I’m quite certain that I came by this trait honestly. My Grandmother is without a doubt the kindest most loving person you will ever know. She goes above and beyond even in small ways to make people feel special and loved. Ever since I was a little girl, (and even before my time I’m sure) she has had a tradition that has been passed down through the family. Enter: THE BIRTHDAY PLATE.

0816180932.jpg

That’s right. A big red birthday plate, gold silverware, & a special napkin. It makes an appearance for everyone’s birthday and makes you feel super special. I’m really thankful that my Aunt got me a set a few years back, and now I can carry on the same tradition!

You may be wondering why “The plate” was out today…. In less than 1 week I will be celebrating the death of my twenties. o_0  Everyone says your thirties are better, and I’m ready to find out! Since Thursdays are spent with my Grandma, I got the birthday plate today along with a DELICIOUS breakfast! My Grandma’s #1 favorite past time is to spoil those she loves with food. I’m sure glad to be one of those lucky people! The recipe she made today is one of my favorites. My Aunt discovered it a few years back at a restaurant in California.

Lemon pancakes are seriously the perfect pancake. I used to be anti-lemon when it came to baked goods & sweets, but my tastes have changed considerably. These things are absolutely amazing. The tart lemon cuts through the sweetness of the pancake and just makes this breakfast so refreshing. I have never encountered a pancake that goes so well with so many topping options. These guys don’t even need syrup. They are fantastic by themselves with a little sprinkle of powdered sugar! You can cover them with a variety of fruit. My Grandma had fresh peaches, strawberries, and raspberries as options today. All were absolutely fantastic. I’m sure they would be great with blueberries and blackberries. We discussed making fresh lemon whipped cream for them….the possibilities are endless.

If you’re tired of the same old pancakes, give these guys a try. You WON’T be disappointed!

0816181004.jpg

Lemon Pancakes

Ingredients

  • 1 cup all-purpose white wheat flour
  • 1/3 cup sugar
  • 1.5 tsp baking powder
  • 1/2 tsp baking soda
  • 1/4 tsp sea salt
  • 3/4 cup sour cream
  • 1/3 cup milk
  • zest of 2 lemons
  • 1/4 cup fresh lemon juice
  • 3 Tbsp butter, melted
  • 1 egg
  • 1.5 tsp vanilla extract

Directions

Mix together flour, sugar, baking powder, baking soda, and salt. In another bowl, mix together the remaining ingredients. Pour the wet mixture into the dry mixture and stir quickly. The batter will be thick and bubbly. Use 1/4 cup batter for each pancake, and pour onto hot skillet. Cook until each side is golden brown. Serve with honey, syrup, powdered sugar, etc.

Activities, featured, Parenting

Ice Age Rescue

Most parents would agree that having a routine is really vital for kids. Yes kids are resilient, but they truly thrive when they have a routine. They know what to expect and what is expected of them. I try my best to keep a fairly basic routine with my little one on both a daily and weekly basis. As I mentioned last week, the two of us spend Tuesdays together. I do a lot of housework, but I always make sure we squeeze in some fun activities, and cook dinner together. One of the fun activities that I have had as part of our routine for well over a year now, is SCIENCE EXPERIMENT TUESDAY! I’m a science nerd at heart, and certainly want Neyland to enjoy it too! Science Experiment Tuesday allows both of us to do a fun activity that also has educational value. I have a blast researching and preparing, we both love actually doing the experiment, and then I try to tie it in to some other learning opportunities throughout the week to reinforce the idea.

Finding fun experiments to do with your kiddos isn’t a difficult task. A quick internet search, or even just thinking about some of the activities that stood out from your childhood can yield great results.

This particular experiment is super simple, but a LOT of fun. It’s great for toddlers and preschoolers, and even elementary school kids. There are a lot of learning opportunities for different age groups.

Ice Age Rescue

Supplies

  • Water safe/freezer safe container (Decent size)
  • A bunch of cheap/plastic/water safe toys (you likely have plenty laying around the house)
  • Water
  • Blue Food coloring
  • Plastic utensils
  • Squirt bottle
  • Salt
  • Sponges

The basic idea for this project is to fill the water safe/freezer safe container (I found a random plastic storage box at Goodwill) with water (about 3/4 full.) Add a few drops of blue food coloring and mix. Don’t skip that step, it really does add to the effect. Place a variety of different plastic toys in the colored water. It helps them spread out evenly if some sink and some float. This is a great time to let your little one see the water and touch it. Explain to them the differences between liquids and solids. Let them see you/help you place the container into the freezer. Check on it every hour or so. It’s important to let them feel how cold it’s getting and feel the ice start to form. Eventually (depending on the size of your container,) you will have a solid chunk of ice FULL of plastic critters that need your little one’s help to break free!

1126171234.jpg

At this point we moved our project to the bath tub to contain the imminent watery mess. I freed the giant cube from the plastic container and offered Neyland several options/tools to try and free the animals. I offered plastic eating utensils for her to chip away at the ice, sponges, salt, and a squirt bottle of warm water. We tried each item individually so that we could observe what effect it had on the ice.

1126171235.jpg

1126171236.jpg

1126171239a.jpg

After trying each tool, I let her decide which item she thought was most effective. She quickly decided that the warm water squirt bottle was the best option! As the ice melted, it was really beautiful. The warm water carved out all kind of cool little passages through the ice, and made breaking the critters free even more fun.

1126171308a.jpg

*As a side note- Not long after I first did this, a friend of mine tried it with her son. She added another educational aspect by waiting until winter and allowing the block to freeze outside over several days! Her son really enjoyed checking on it each day, and it was great to connect the actual weather outside with the experiment!*

1126171256.jpg

1126171308.jpg

This is seriously simple and seriously fun. It’s a great sensory activity for toddlers and learning activities for preschoolers. You can teach each child as much or as little as they are capable of absorbing for their age. I guarantee they will be asking to do it again!